Friday, December 7, 2007
How to get great Sunsets for Shoots
I love afternoon shoots and there's nothing better than "Golden Hour". Golden Hour is one hour before sunset when you get all kinds of great warm light as the sun sets.
I have created a table based on this website:
http://aa.usno.navy.mil/data/docs/RS_OneYear.php
Where I've identified all the saturday's for next year and the time that sunset begins and that twilight ends. Typically, this is a 25-30 minute window. If you're looking for the blue sky photo like below, you'll want about 15 minutes or so after sunset, depending on if you're pointing the camera east or west. The blue sky effect will first start in the east and then end up in the west as the sun goes down.
I'll attach a download of all the dates for Macon, but you can use that site to create one for wherever you are. It's great for planning shoots.
If you are a comercial shooter or have a shoot where you need to know a lot about the suns position as it goes down check out this website:
http://www.wide-screen.com/
This site sells software that will allow you to know how long the shadows in your images are going to be so you can plan everything and set everything up before time and just wait on the sun
If you needed really long shadows, this software can tell you exactly when they are.
You got to check out this software. Commerical shooters and Filmmakers both use this softare.
Here's the table I came up with for Macon, Georgia (31210):
Click this link to download the sunset table for Macon.
Friday, November 30, 2007
Blue Skies
One of my favorite things at a wedding to do is to try to get a "scene setter" shot of the reception venue right after sundown. It's a little tricky, but for about four to five minutes every day, there's a dark, deep blue sky that you can photograph behind your venue or location.
The trick is to wait to take the shot until the exposure of the sky is the same as the building. That's how I took all these images. I went outside and pointed my camera at the sky and took an exposure and then I took an exposure from the building. When the two started to match, I started shooting.
You can do this with anything that time of night. I've even managed to shoot brides and grooms with this deep blue light behind them. None of the images below had any photoshop on them other than light saturation. This is how they looked on the back of the camera when I shot them.
I hope you enjoy getting this effect on your late afternoon shoots!
Wednesday, November 28, 2007
D300 Lightroom Preset
After processing several shoots with the D300 I decided that our normal Lightroom import needed some tweeking because the D300 images are brighter than our other Nikon and Cannon camera's (see the blog entry below).
I updated our default lightroom preset import and thought I'd offer it to you for free to play around with and see what you think. This preset creates some slight vignetteing, portrait level sharpening, contrast, exposure and brightness adjustments and a small amount of saturation.
You can download The D300 Preset by clicking this link.
The install instructions are simple. Just go to your preset folder and drop the file in the user presets folder and restart lightroom.
If you are on a PC the folder path is:
C:\Documents and Settings\~Your User Name Here~\Application Data\Adobe\Lightroom\Develop Presets\
If you are on a Mac the folder path is:
~/Library/Application Support/Adobe/Lightroom/Develop Presets
Let me know how this works for you!
D300 Review
I have had the D300 for a few days now and yesterday afternoon I did a shoot with Amanda who works with me as a production associate in my studio. This is the image that we came up with.
It's funny, every time I get a new piece of software or equipment I'm always dragging my office staff off to shoot them and test it out. Talk about bad working conditions!
I've enjoyed using the D300 so far. The focus seems, for the most part, much faster than the D200 in normal lighting conditions.
I did observe something odd. Yesterday, I did a shoot in my studio and had the lighting pretty low and the D300 seemed to have trouble focusing in single point mode. I switched it to Dynamic Area Autofocus and it locked on every time. I'll post more about this if it proves to be an issue.
The camera has "live view" which makes it work like a consumer camera. You get to see the images on the back of the screen. Sometimes I have to hold my camera up over my head to shoot over the tops of people's heads at weddings. I have gotten to where I'm pretty good at aiming the camera this way, but being able to actually look up and see what the camera is look at is going to be really useful in those crazy dance floor pictures.
We went outside and shot some with Amanda and it was a lot of fun. I L-O-V-E the noise ability of this camera. I shot my daughter running around our living room on ISO 6400 and I could actually use the image if I needed to.
I love having as much ISO as I wanted and not have to worry constantly about noise like I do with the D200.
One thing I noticed in post processing is that the Camera produces noticeably brighter images that the D2x or the D200. In fact, Nikon has released some presets that will make the D300 emulate the D2x and D200.
You can download those presets by clicking here.
I noticed in the fine print this sentance: "*To achieve a level of brightness similar to that of images captured with the D2X/D2XS, set Picture Control Brightness to -1."
And it's true. When we brought the D300 images into Lightroom, we had to treat them a little differently. They were brighter out of the camera.
I think this is a good thing. Most of the information of an image is stored in the brighter parts of the image. So you will get a better image if it's slightly overexposed than if it's underexposed.
We are working the camera into our shoots. First, we'll use the camera ourselves and test it under different conditions, and then we'll use it on some portraits and then it will have some limited use at some weddings and then after we've processed the images we'll start using it exclusively.
I'm really excited about this camera. I think it's going to be an awesome tool for us to use.
Sunday, November 25, 2007
Delaney Holliman Lightroom Presets
Presets are awesome because they give all our images a consistent look. Right now we have five different people in our Production Group who can color balance and edit images in our studio. I’ve mentored them all to color balance with the same “voice” and the presets help to ensure that no matter what team member color balances an image they do it with our style. Our presets are a big part of that.
Take Sepia for instance. For some people, it’s the bomb. They Sepia everything. They love that old look. For me, for some reason it’s like scratching your nails on a chalk board, or seeing someone wear spots and stripes together. Both can be painful. Wow! Look it’s Sepia! Eeeww! ;)
We do have an “Antique” preset I created for that once in a while (or once in a lifetime) that it really does work, but sometimes something gentler is better. What we love to use more often is a preset we call “Brown Tone.” The Brown Tone preset is a black and white photo treatment with a touch of warmth.
Yummy! We have presets for different import treatments, basic presets for fundamental color work and creative presets when you want to get funky.
We have over 40+ presets that our team uses on our images here at my studio.
I’ve had people express interest in our presets and want to purchase them for their own use, so I thought I’d make them available. If you’d like to use them with your own work, I’m making the available to you for $39.95 in our online store. That's less than a dollar per preset.
Click here to see some examples of how the presets work.
Click here to purchase the presets we use in our color balancing process.
Enjoy! And make sure and let me know what you think!
Adobe Photoshop Lightroom Color Balance Example
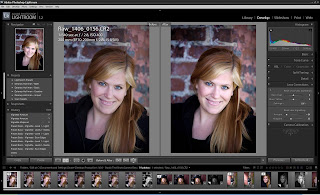
After the last post, I thought it might be good if I went through an example of how I would color balance an image in Lightroom. I’m going to use a image of Jenny, one of my Production Associates who helped me test out a lighting technique the other day.
We were working with some off camera flashes balanced with natural light. I’ll try to do a post on that shoot another time, but I had some of the images in Lightroom, so let’s take a look at what I’d do with an image we made.
To correct density for an image, what we’ve found works for us is to first set the exposure to the point where the image shows some true whites in it, then set the shadows to set the black point and then use the brightness slider to set our mid-tones.
Depending on the image, we want to see true whites and true blacks and nice middle tone details. For instance, if we have a groom in a black tux, we want to see his teeth as white and his tux should have parts on it that are truly black.
To do that, we first use the “Exposure” slider to set our “white point.” We will move it up and watch it until it shows that some of the white pixels on the image are “blown out”. Pixels have a britness setting from 0-255. When they reach 255 they are as bright as they can go. We like to see some pixels that barely reach 255. Maybe they are 250 or 253.
Then we will back it off a little until they are right at the brink of being blown out. The image looks like this:
Then we will do the same thing for the “Blacks” in an image. We want to see some true blacks “0” in the shadows. This is especially nice if you can get it in the subjects hair. Be careful not to lose all the shadow detail in the image.
Then, we’ll bring our brightness down to the point where we have pleasing mid-tones and we’ll set the color tempature, saturation and vibrance to get the images color where we want it:
The Lens correction dialog is very useful in creating vignettes that focus the attention on our main subject by applying a dark vignette around our subject:
And finally, we’ll zoom all the way in and make our sharpening selection.
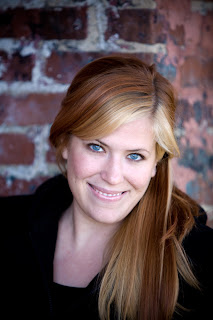
And in the end we have a much more pleasing image:
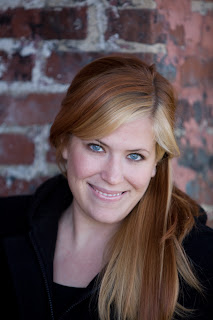
Straight Out of the Camera:
After Lightroom:
How We Color Balance our Images
There are extensive tutorials on the Adobe site, but I thought I’d give you a quick peek at how we use it.
First we import all the images using an Import preset we created for Photojournalism. That preset provides a “baseline” for all our images. We click File and then Import Images and import the RAW or Jpeg files into Lightroom.
After we have the images in Lightroom we begin working on them.
For each image, we have to decide how we want the image to tell the story. If we want a photojournalistic approach, then we’ll color balance the image to be something you’d see perhaps in Time Magazine or National Geographic.
If we want a more editorial look, we’ll stylize the image like something you might see in a fashion magazine. We might use some of our “creative” presets and do some cross processing, or make everything really blue and moody or bright and happy (like our California girl preset.)
Once we’ve decided on a look, we color correct each image. We set the exposure, then the blacks and then change the brightness to get the midtones where we want them, then we tweak the overall contrast. That sets the “Density” of the image. We like to see true blacks and true whites in every image if possible.
Then we’ll work on the color. We’ll first check the white balance. We may make the image warmer or cooler using the Temp and Tint sliders. After we have our white balance, we’ll set the Vibrance and Saturation to get the amount of color in the image we want.
The Vibrance slider algorithm tries not to affect skin tones so if we are happy with the skin tones we have we’ll use the Vibrance slider to make the other colors pop in the image and if we want some more “tan” in their skin, we’ll use the Saturation slider a little and then the Vibrance slider. It seems like we just use the Vibrance slider most of the time.
After we’ve set the Density and Color then we’ll do any red eye correction and spot correction. Then we’ll set the Vignette using our Vignette presets or the Lens Corrections dialog. If we use a strong Vignette, then we might have to change our density a little to compensate (make it brighter again).
The final thing we’ll do is sharpen our image using the Detail Sharpening dialog. If it’s a portrait we want to make sure we have a “crisp” image but not one that’s so sharp that someone’s pores show too strongly. Adobe has a portrait sharpening preset that comes with it that sets the Amount to 35, Radius to 1.2, Detail to 20 and Masking to 70. Landscapes are set at 40, 0.8, 50, and 0. I generally start there, zoom in and then make adjustments as needed.
If there is noise in the image we will use the noise reduction dialog. If there is one color in the image that is distracting, like someone’s pink shirt, we’ll use the HSL dialog to tone it down a bit.
After all the images are color corrected, we’ll renumber them and then export them as Jpegs. We use the export dialog to burn a disc so we’ll have a hard copy of all the Jpegs for the physical file.
Once the Jpegs are created and the Jpeg discs are made, we’ll remove the folder from Lightroom.
After the Images have been color and density corrected, we’ll edit the images in Photoshop and do additional retouching work such as selective sharpening, dodging and burning and liquefy.
And that’s briefly how we do our color balance work here at my studio. I hope that gives you some ideas around your own workflow.
Subscribe to:
Posts (Atom)